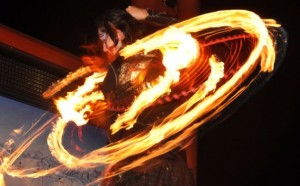
Ever wonder how the Zen Arts crew produces so many visually-striking images of light and fire performance? Well it’s not through Photoshop, Illustrator, or some other means of photographic digital manipulation. All it takes is a simple adjustment of your camera.
Long-exposure photography has been around since the beginnings of photography itself. It involves the creation of images featuring a streaking, blurring, or smearing effect, produced by photographing lit objects moving at quick speeds. Long-exposure photography works by holding the camera’s shutter open for an extended period of time, allowing the camera to try and capture movement upon a singular still image. A moving object producing light will create light trails, and unlit moving objects will create transparent silhouettes. When unwanted, the effects of long-exposure photography are often called motion blur.
Producing a long-exposure image requires the shutter of a camera to be held open longer than usual, an action known as slow shutter speed. This allows light to enter the camera for a longer period of time, creating the crazy effects of long exposure we’ve discussed. Slow shutter speeds work best at night, but also could be used for day effects of moving water or clouds. Due to the fact that there is less ambient light at night, long exposure at night allows the lens to capture only the moving light source, creating bright and crazy patterns. Any moving objects emitting light will create intricate lines, circles, and streaks, whereas stationary objects will be photographed as usual, with clear edges and fine details. Long-exposure effects let the viewer feel the speed of objects, feel a sense of mystery in environments, and add overall intrigue to any average scenario.
To produce a long-exposure image the photographer will need a few basic photographic tools, the main one obviously being a camera, specifically one capable of manual settings. Setting the camera to manual allows the photographer to take control of light adjustments that the camera would fixate itself if set to automatic. Depending on the scene being shot, the amount of light being emitted, and the speed of the objects photographed, the photographer must adjust the shutter speed and aperture (size of the opening through which light is allowed) manually. Additionally the photographer could also adjust the ISO setting on the camera, to manually adjust the shutter speed/aperture combination used. Previously in film cameras ISO was used to mean the speed of photographic negative materials, but in our newly digital camera age it now represents how sensitive the digital image sensor is to the amount of light present. A high ISO means high sensitivity to light, something you’d want in dark, night, or low-light situations. However, higher ISOs allow sensors to record fainter light eminences, resulting in more image noise (aka “graininess”). Excessive noise could result in a pixilated image, full of colored dots. High ISOs on regular digital cameras can create troublesome images high in noise due to a smaller image sensor. To the contrary digital single-lens reflex cameras (DSLRs) contain larger image sensors, meaning the pixels themselves are larger, allowing each to receive more light and thus result in less noise, even at high ISOs.
An automatic ISO setting tells your camera to obtain the best image quality at the lowest possible ISO for the situation you are photographing, automatically adjusting aperture and shutter speed dependant upon the amount of light available. For bright situations the lowest possible ISO is ideal, whereas low-light or night-time situations need either additional lighting (like a flash), or a higher ISO.
In addition to the ability to manually adjust shutter speed and aperture, a photographer attempting long-exposure also requires a tripod for better stabilization. Holding a camera with the hands at slow shutter speeds results in shaky and over-blurred messes. A tripod or some other stable surface the camera can rest upon will reduce the effects of shakiness and blur.
Furthermore, utilizing a remote trigger is best, seeing as pressing a camera button can shake the camera and ruin the shot. One of the benefits of a cable or remote release is they usually have a locking feature so you wont have to hold the trigger down for long periods of time, especially if you are attempting a very long exposure shot (e.g. starry swirls in the nighttime sky). Without a remote, most cameras have two settings for manual shutter speed: B (bulb) and T (time). A B setting keeps the shutter open as long as your finger is depressing the camera’s button. A T setting opens the shutter when the button is depressed and then closes it once the button is depressed a second time. A fourth option may be a self-timer setting, in which you can leave the shutter open for a specified amount of time automatically, without having to monitor the camera button.
If manually adjusting the shutter speed, the length of time the shutter is held open should be gauged by the brightness of your subject and how quickly it is moving. For a fast-moving and bright subject, start with a relatively moderate shutter speed anywhere from 3 to 5 seconds. Slower-moving subjects that are not as bright may need a shutter speed of 15 to 30 seconds. Since slow shutter speeds allow a great deal of light to saturate the chamber, simultaneously the aperture should be kept small so the image will not result overexposed. This is especially true if you’re doing a slow shutter shot during the day, in which a lot of ambient light can burn the image and wash everything out.
When it comes to lens aperture, the size of the opening is usually indicated by an f/ratio number, and the higher the f number the smaller the aperture. A 28 mm lens set at f/2.8 has an aperture of 10 mm (28 divided by 2.8 equals 10), while the same lens set at an f-stop of f/16 has an aperture of 1.75 mm (28 divided by 16 equals 1.75). The higher the f/ratio number, the larger the aperture, the more light will be caught by the lens. A setting of f/8 or f/11 is good for trying to attain an image with a slow shutter speed, but may need to be made even smaller (aka increased f-stop) if there is too much light.
Aperture also affects depth of field, so this should be taken into consideration when trying to attain your desired effect. The lower the f-stop number, the larger the aperture and thus a narrowing in depth of field, resulting in sharp focus of objects within an narrow range, and a defocus of background objects. Vice versa, a higher f-stop number creates a smaller aperture making the lens act like a pinhole, focusing all objects both near and far for maximum sharpness.
When trying for day-time long exposure shots, maybe to capture the rush of a raging river or the movement of clouds across the sky, extra tools like filters will help hold back the extra unwanted light that could wash out the picture. A neutral density filter is usually colorless or grey, and is a great tool to lessen the gravity of daytime light during long-exposure shots.
In many ways long-exposure photography is a process of trial-and-error. Since it can be difficult to guess the appropriate settings for the amount of light and movement present, many photographers shooting long-exposure practice bracketing, in which multiple pictures of the subject are taken at various shutter speeds to ensure that at least one will have your desired effect. This can be especially useful since sometimes its difficult for cameras to determine the appropriate aperture setting on slow shutter speeds in low light. Bracketing can involve changing shutter speed, aperture size, ISO setting, or any combination thereof between shots. Many modern cameras have an automatic bracketing setting that makes the adjustments among a series of shots, saving time and hassle for the photographer having to make the changes manually between each shot.
Long-exposure photography is a two-way street, meaning it works for both stationary photographer and moving subject, or stationary subject with a moving photographer. Both techniques are often used in what is considered the art form of light painting.
First started accidentally by Frank Gilbreth in 1914, light painting is the result of night-time exposures with a moving light source, or moving cameras across a stationary light source, both in an effort to purposely create unusual patterns and lines of light, sometimes discernible as objects, people, or script. Using small lights and leaving his camera’s shutter open, Gilbreth wanted to track the motions of his manufacturing and clerical employees, in an effort to create more efficiency and see how their jobs could be made easier, while still increasing output. What came out of his camera were the first light paintings.
The first photographer to purposely use light painting was Man Ray in 1935 in a series entitled “Space Writing.” After Ray soon many other artists followed, most notably even Picasso himself. Upon seeing photographer Gjon Mili’s light images of a figure skater with lights attached to the skates, Picasso starting creating light paintings right away, resulting in his famous “Light Drawings.”
Light painters pull their light source from a large array of choices including flash lights, fiber optic light pens, candles, matches, glowsticks, and of course fire poi! Light painting must be done in a completely dark setting so no additional light pollution will affect the camera. Setting the camera in a fixed position, light painters then open the shutter and quickly begin drawing the design of their choice. In light painting, its important to always keep the light moving and try not to repeat areas. Stopping, lingering, or repeating spots will cause burns in the resulting photo, with extremely bright spots washing out the rest of the image. Brightness of the light in the photo will vary depending on speed of movement: moving the light slower will produce a brighter streak whereas moving it quicker will produce a thin line. The same principle applies for how close the light is to the camera: the closer the light source to the camera, the brighter the image.
Some light painters choose to move the camera as opposed to the light source, a form of light painting more technically known as camera painting. Moving the camera around like a paintbrush, trying to capture lines and patterns of the light source, camera painters can create some of the same effects as light painters. Also, many light painters incorporate projections into their work, using light art to paint images on people or objects, not unlike this Zen Arts photo of the dancer with a tutu skirt made of light.
As with regular long-exposure photography, light painting works best at a low ISO to decrease noise (aka grain) and give the best chance for a good exposure. Noise also tends to increase with exposure time, but the advanced sensors in DSLR cameras produce images with significantly less noise than smaller cameras. An ISO of 100, shutter speed of 10 seconds, and relatively large aperture of f/4 to f/8, is an ideal setup to begin light painting.
Although all the exposure tricks we’ve discussed work with film cameras as well, obviously digital cameras produce the best results because they allow the photographer to see the effects right away and make any corrections as they work.
If you’ve got a camera, you’re more than halfway there. It’s time to close the curtains, turn the lights off, and get started! And if you’re fortunate enough to view a Zen Arts performance, try your hand at some long-exposure and email us the pics! You never know they could be featured on the website.
For more amazing Zen Arts long-exposure light images be sure to check out the Zen Arts Facebook page and blog page regularly for new uploads.